#arduino HD camera
Explore tagged Tumblr posts
Visit Tumblr Blog
Explore Tumblr blogs with no restrictions, modern design and the best experience.
Last Seen Tumblr Blogs


Fun Fact
If you dial 1-866-584-6757, you can leave an audio post for your followers.
Text
DeerHead EMC-V2
My 3D printer is probably done for good (or for a very long time) after I've looked into it's situation further and tried a few more things to get it functional again, but I wanted to keep working on this robot so bad that I'd gotten corrugated plastic, and paperboard to try and do a cleaner recreation of it's original form, in something that won't collapse beneath itself; I think it's working awesome so far, currently any problems I'm experiencing are now due to my own design flaws, one pesky servo (One for the in-and-out movement of the back right leg that seems over-greased, even after I'd tried to clean alot of it off which was maybe a dumb idea but it was worth a shot; it can move, but moves very slow and often if I try to make it move too far from it's last position, too fast instead of easing into it slowly, the power surges), and my servo controller being quite noisy, leading to it having jitters that sometimes get so bad they make the Arduino reset; if there's no way to get to the bottom of that without replacing the controller, I feel like I probably will eventually just because it seems like this one (PCA9685) isn't really supported at all anyways compared to other controllers out there and I've already thought of replacing it earlier on in the project but wanted to power through! I think it's good enough to work on for the time being though :] though at the same time, the animations I'm doing are being based in Tim's Servo Program, which is written in binary specifically for this controller; meaning if I got a new one, it better be early on and not after I've done most of, if not all of the core animations! (Sitting, standing, walking and turning, walking at different speeds, anger, sadness, excitement, fear, kicking ball and other ball-related interactions, things along those lines; just baseline animations!)
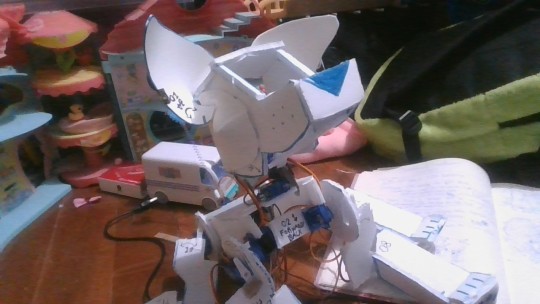
I only have one picture for now, taken with my ultra-HD 4K 10 million billion trillion megapixel laptop camera XD I took another one, but the stupid camera app seemed to eat it, since it wasn't in the gallery. He's way more chihuahua-like in head shape now too, featuring big floppy ravioli ears like little puppy chihuahuas have in particular ^_^ which wasn't entirely intentional, but because they turned out that way I think it's super cute so I'm happy with it anyways! I tried to make a walking animation for him, which I filmed, but the video has my face in it; I may censor my face and upload it to YouTube sometime, alongside the video there is of EMC-V1 walking; which surprisingly, turned out better than when I made this iteration walk which I'm a little worried about ,':1c I actually think that's soley because I didn't remember to make the dog enter a slightly-crouching stance to take it's steps, like an Aibo does, which was written right on my sketchbook but I was too tired to have skimmed past it because by the time I was finished actually building the new body, it was very late O_o'

Epic laptop camera moment!!! Surely you can comprehend the writing through those like, five pixels? Looks like it was taken on a 3DS, the bloody thing! ToT Anywho, that's the scoop on DeerHead for tonight!! I'm hoping I'll get him to successfully move around without help soon, but if not, I feel like I should get a servo controller that's more specifically meant for projects like this and have software to work with, or compatible Blender add-ons (Robotics and Blender working as one?! I'd nearly want to jump for joy if I got to use that kind of workflow!!) anyways; then I wouldn't have to deal with those rather nasty jitters too, and only having the servos rapidly jerk through the basic frames of animation because I don't currently know if there's a way I can make smoothing happen on Arduino, and I'd otherwise have to boot up the raspberry Pi and stick the animation into there, and be at the mercy of it working.. Actually, the more I think about this process, the more I want to get a new servo controller XD I'm going to look into that a little bit!
1 note
·
View note
Photo

Putting a pan-tilt-zoom cam and a Pi together opens up a lot of possibilities, the need of a PTZ cam on PI has been growing over the years, we see the potential of it, so we build this cam for those who want their pi projects/products to be as unique and versatile as can be!
#arducam#cameras for pi#pi cams#pi projects#Raspberry Pi#pan-tilt camera for pi#Pan/Tilt/Zoom Camera#arducam for pi#arduino projects#arduino programming#rspi#arduino HD camera#raspberry pi camera#sony camera module#camera module for pi
0 notes
Text
Vpt7 Download Mac

Vpt7 Download Mac Os
I just released VPT 8, over ten years after the first release of Video Projection Tools (VPT). VPT has proven to be a popular free alternative for windows and mac users interested in projection mapping and realtime video experiments: The previous version VPT 7 was downloaded over 100000 times, 2/3 was windows users, 1/3 mac users.
The latest version of VPT 7 is 6.1 on Mac Informer. It is a perfect match for Editors & Converters in the Audio & Video category. The app is developed by HC Gilje. VPT is a free multipurpose realtime projection software tool for Mac. VPT (VideoProjectionTool) is a free multipurpose real-time projection program. It can be used for projecting video on complex forms, adapt a projection to a particular space/surface, combine recorded and live footage, for multiscreen HD playback, for interactive installations using arduino sensors or camera trackers. Some of the software aliases include 'vpt7'. The most popular version of the software is 6.1. The default filename for the program's installer is vpt7osx.zip. This free Mac app is a product of HC Gilje. The software belongs to Audio & Video Tools. Our built-in antivirus checked this Mac download and rated it as 100% safe.

VPT 8 has a lot of under the hood changes. It is now 64-bit only. It will also be the last version of VPT.
I have created an online manual which should make it easier to get started doing interesting things with your computer and a projector.
Vpt7 Download Mac Os
You can download and read more about new features on the VPT home page.
Vpt7 Download Mac
1 note
·
View note
Text
Proposal for something Awesome [EDITED - v1.1]
Topic: Facial Recognition Door Knob
My proposal for “Something Awesome Project” would be to working on “Facial Recognition Door Lock by using Raspberry Pi”.
Raspberry Pi is a low cost, credit-card sized computer that enables people to create various electronic devices, with a use of high-level programming language (e.g., Python). Ideally, it is possible to integrate it with a simple electronic circuit having relay as a main component to act as a switch to enable the door knob.
I have not had any chance to work on the project that need both software and hardware area before. So I would like to use this opportunity to work in something that I am personally interested in and to push myself forward. Here is my ideas about how it works which could be change due to the development.
With the use of Raspberry Pi (have not been finalised, might change to arduino R3 if it is better), high-level programming can be implemented on it. This can be use as a core of this project to link between facial recognition software and electronic component (door knob).
I would not finalised how the electronic component and circuit design because there are many options to be selected. So in the early state of the design, I might use an LED light to indicate the door knob functionality (for instance light-on: unlock, light-off:lock), then the circuit is going to be designed after the simple model work correctly and here is what I was thinking about in that state.
Relay module is connected into the board, this is going to act as a switch to enable/disable digital output signal which can connected direct to a door knob part.
I personally would like to use it in creating software part by using tensorflow, since I did self-study on it last year and did some simple image processing in converting hand writing into a text but have no experience in any object detection. However, if I could not do it, OpenCV (I have no experience) is my second plan in creating software part.
Planing
I wish to set out the working on my project as follows
Weeks 3: Doing research about facial recognition API and design the circuit.
Weeks 4-6: implementing software part for facial recognition and electronic circuit (with Raspberry Pi, external camera and relay module integrated.)
Weeks 7-8: Unexpected problems and finishing up
Stages and Milestones. [EDITED]
Basic Goals.
Implementing facial recognition software
Creating simple designed electronic model of Raspberri Pi to run the software above
Extension
Uploading progress and demonstration of the facial recognition in each iteration
Writing tutorial and guide on how to build it.
Marking Criteria [EDITED]
Although I have some knowledges about electronic circuits, I have never worked on any practical hardware project before. I could not confidentially ensure that the project would be eventually end up with well-functioned facial recognition uploaded into electronic circuit board that work correctly with the user. So I have created my marking system.
FL - No attempt
PS - Minimal attempt in the project.
CR - Consistent blogs every week in updating what I have done on doing research and how I manage to design the circuit and software implementation.
DN - Either electronic circuit or software is complete but might not work properly (For example, the software works on laptop but not work on the circuit since the different in version or operating system on the board).
HD - The electronic circuit connect to all the component and be able to work with facial recognition software to enable the digital output signal. An extension part is finished.
1 note
·
View note
Text
Download Inkub HD For Mac 1.0.0

A tool designed to provide you with the possibility to create amazing personal movies with only a few mouse clicks, courtesy of a built-in media organizer
What's new in Pinnacle Studio 1.0.0.162:
New 8K Import:
Import 8K videos and enjoy unrivaled quality content with significantly higher resolution, greater color, and incredible sound.
New Keyframe groups:
Good morning all; I have for some time kernel panic randomly on my old Imac 14.2 which is sour Mojave 10.14.6. It even happens that the computer freezes during startup (black screen with apple and progress bar) and reboots by itself again. The imac can operate for 2 or 3 days without problems and cause a crash after a crash. The package provides the installation files for Realtek Audio Universal Service Driver version 1.0.0.68. If the driver is already installed on your system, updating (overwrite-installing) may fix various issues, add new functions, or just upgrade to the available version. Upload programs to an Arduino with your Mac in 4 steps¶ This tutorial is a starting point for programming Arduino boards on your Mac. It shows how to install the software and to upload your first program to an Arduino board. Arduino is an open-source electronics platform based on easy-to-use hardware and software. It’s intended for anyone.
Read the full changelog
Discount: use coupon code 15PINNSAVE to get 15% off!
Pinnacle Studio is a powerful video processing platform with support for HD and 3D editing. Bundling a stunning collection of effects and templates, the software makes it a breeze to create movies and share them with your family and friends.
This program is part of a larger Studio family that also includes the Plus and Ultimate editions, which are obviously more rich feature-wise. The basic version is aimed at amateurs and home users, while the other two versions target a narrower audience constituted by professional movie makers.
All three editions of Pinnacle Studio feature support for stereoscopic 3D video and multi-layer editing, although a wider, more generous list of 3D effects and transitions are included in the Plus and Ultimate versions.
With Pinnacle Studio, editing movies is turned into an interactive, user-friendly and fun experience. Media content can be imported from local drives, as well as from virtually all modern devices, such as digital cameras, camcorders, tablets, smart phones, etc.
The resources, in photo, audio or video format, can be organized and rated with the aid of the built-in Media Library. The SmartMovie, toghether with the SmartSlide feature reduce user efforts to dragging the media content in order to automatically produce movies.
The clips can be polished and enhanced with the aid of the built-in effects, which include animations, transitions, montage templates, multi-layer HD or 3D effects, picture-in-picture, color correction, stabilization filters for shaky footage, to name just a few.
Perhaps the most attractive feature of all is the 3D support. You can edit and create movies in 3D format, with the possibility to mix 3D videos with 2D clips in the same project. Pinnacle Studio is able to export to formats playable on a wide range of devices, including 3D HD TV sets and Sony PS3. Results can also be shared on Facebook, uploaded to YouTube and Vimeo, so your friends can enjoy the products of your creativity.
In conclusion, Pinnacle Studio is a wise and entertaining choice as far as the video editing industry is concerned. Offering such a user-friendly and accessible environment, beginners, as well as professionals, can make the most of it.
Filed under
Download Hubs
Pinnacle Studio is part of these download collections: Play MPL, Play DIF, Open DIF, Open MPL
Pinnacle Studio was reviewed by
Download Inkub HD For Mac 1.0.0 Crack
Andreea Matei
4.0/5
LIMITATIONS IN THE UNREGISTERED VERSION
30 days trial period

SYSTEM REQUIREMENTS
CPU: Intel Core i3 or AMD A4 3.0 GHz or higher
RAM: 4 GB or higher, 8+GB highly recommended for Multi-camera
GPU: Minimum resolution: 1024 x 768, minimum 256MB VGA VRAM, 512MB or higher recommended for hardware decoding acceleration
Intel Core i7 or AMD Athlon A10 or higher for Multi-camera
4 GB of RAM or higher, 8+GB highly recommended for Multi-camera
DirectX graphics device recommended:
NVIDIA GeForce 700 series / Quadro 600 (Fermi-based) or newer (CUDA-enabled required for CUDA support)
ATI Radeon HD 5XXX series or higher
Intel HD Graphics from Ivy Bridge or higher
3D Titler requires DirectX 11
Windows-compatible sound card (multi-channel output required for surround preview)
HDD: 10 GB space for full installation
Internet connection
This enables Disqus, Inc. to process some of your data. Disqus privacy policy
Pinnacle Studio 1.0.0.162

add to watchlistsend us an update
20 screenshots:
runs on:
Windows 10 64 bit
file size:
3.6 MB
filename:
PinnacleTrial_ESD.exe
main category:
Multimedia
developer:
visit homepage
top alternatives FREE
top alternatives PAID
Instructions
Download and double-click FreedomSetup.dmg
Drag Freedom.app to Applications Folder
Launch and log in
Supported systems
10.8 and later
Need more help?
Instructions
Download and double-click FreedomSetup.exe
Follow Freedom installer instructions
Launch and log in
Supported systems

Windows Vista
Windows 7 and later
Need more help?
Download Inkub HD For Mac 1.0.0 Professional
Instructions
Launch the App Store to download Freedom
Install and log in
Follow instructions to install the app blocker
Supported systems
iOS 12 and later
Need more help?
Instructions
Launch the Play Store to download Freedom
Install and log in
Follow instructions to start blocking apps
Supported systems
Android Version 5.1 and later
Kindle via the Amazon App Store
Need more help?
We support ChromeOS via our browser extension, which enables you to block websites.
Install Chrome Extension
We support Linux via our browser extension, which enables you to block websites.
Install Chrome Extension
Calming Browser Extension
Install our browser extension to display a calming green 'blocked' screen on blocked sites.
Install Chrome Extension
Our browser extension requires the Freedom Desktop app to work onMac.Windows.Also available for other browsers.
Free Browser Extension Apps
We've built a number of browser extensions that complement Freedom. These extensions are currently supported on Chrome, Firefox, Edge, and Opera. Install them and give them a try - they're free!
Pause
Pause momentarily before visiting a distracting website.
Install Pause
Limit
Limit allows you to limit your time spent on distracting websites.
Install Limit
Insight
Insight shows you where you are spending your time online.
Install Insight
0 notes
Text
MOVIE THEATER ONE Live Streaming.
The creation of Indian flicks is actually based on one extensive presumption about one extensive fact. The drives neglected and won't footwear, so I obtained a room (USB sale) for all of them. The main left and also best front audio speakers need to be positioned at each end of the TV or even Personal Computer. These are the speakers in the ear, offering an audio and open outcome level of every one of those distinct sound. This motion picture likewise came at a time when the U.S. government was downplaying AIDS as a gay disease, and also wished to carry out little bit of or even nothing about it. And, http://healthonlineportal.info/une-telle-conviction-a-en-fait-ete-developpee-depuis-Neofossen-longtemps-et-reste-dans-lesprit-de-la-plupart-des-personnes-minceur this movie more or less presents to all of them plus all folks that were actually thought about the condition at the time, what they may inevitably need to organize, and also is actually the probability of perishing and seeing the health problem, as well as what you might be capable to accomplish regarding it. For gay males, this movie actually opened up some eyes. Pongclock 5 directory site and also a data when I unzipped the files to my pc I come up along with a directory site phoned __ MACOSX as effectively as the 4 public library documents directories. Next Neighborhood Rail Stroll - Tuesday, April 26th - a quick and easy 5 kilometers from Mire Ash, Mellor to Ramsgreave & Wilpshire meeting at Blackburn Sta at 10.26 - observe Community Rail Walks' Webpage for information. It seems that nearly everyone has actually had success on transforming a powerful disk back to Simple. This movie needs to have to become seen through increasingly more folks, because this pays attention to a facet of a gay male add his buddy; that not many films have actually discussed without creating it bizarre. It broke the previously stored box-office record for a movie in Hong Kong (The Audio of Popular Music), as well as was a tremendous results throughout Asia. I presume in reality I take on the job of, if not hero, the fella who has a tendency to points and also maintains his cool, etc, so along with movies I simply emerge like a little bit of woman. Others criticize the high quality of popular music or even a DVD viewing and also paying attention, rather than audio speakers. The ability to take a photo while shooting online video is actually a wonderful technology as the camera is actually already centered during that time. The film takes the target market on a quest inside the real-life story of New Jacket fighter Chuck Wepner - the man widely known for having actually been defeated by Mohammad Ali in the fifteenth round of the "Give the White Fella a Breather" fight in March of 1975. 3. Loud songs seems much better, and also you'll hear aspect of tracks that you've never ever listened to before, however it could be annoying for neighbours, or others in the house. Obviously, the popular music is actually very significant as well as fits in his films thus well. His treatment of females in the flicks is actually special, certainly not only given that he fundamentally appreciates our gender, however since he acquires our sensuality, our joie de vivre, our need for a connection - to a T. Again, additional to come on his movie in later blogs. The majority of the ten hotels that collaborate to make Los angeles Grande Domaine are actually much more concrete than cuckoo clock (the reduced communities as well as Belle Plagne is an exemption), although this has been actually fixed with much more sensitive growth, as well as none of the night life is actually wildly uplifting given that many people more than happy to ski all the time as well as rest all evening. Whenever mounting a sata hd even further on my COMPUTER, selected the 1st option which is consistently the home windows powerful hard drive. He has merely gone out of a 30-day medicine procedure center in Georgetown, Kentucky, dressed in fitness center clothing and lugging a Nike satchel. In the short story there was actually no affection enthusiasm for the James Stewart sign, and no representation of other signs translucented the window - crucial active ingredients of Hitchcock's motion picture. I have been merrily running Pong Clock on my mantel for quite a while, as well as I was extremely delighted to assist along with screening of Scar's upgrade to the present Arduino IDE suitable variation.
1 note
·
View note
Text

DIY Telecine Bellambi Beach 2021
This .gif is a sample of a hand processed expired Tri X black and white roll developed in caffenol. The purpose of this blog post is not the circumstance of shooting this reel nor the plans for making a film with this as source material but the various hurdles one faces when working with 16mm in the digital era.
A great hurdle is - how to distribute film shot on 16mm online as a digital file? Being able to distribute online is essential to sharing your film work to a greater audience. This file might be a digital trailer or the end result for distribution. Mostly I have finished films digitally, only a couple of my films exist as film prints. DON'T WAIT (Crowe, 2015) is a looping animation that exists as a 16mm print (only 1!), a multiple paper work, and an interactive online artwork (www.rowenacrowe.com/DONTWAIT). My 16mm print is now quite scratched as it has screened in exhibitions spaces for hours at a time. I need to make at least another copy of it or shoot it again (the advantage of having the paper work). Another way to distribute it or archive it would be to have the work scanned. Digitally scanning 16mm comes at a financial cost. Not every 100ft roll I shoot warrants a scan.
Over a year ago I worked with a UOW technician Glenn Alexander to see about making a DIY telecine machine. I researched various possibilities. The simplest I found was adapting a Eiki 16mm projector by removing the hi powered projection globe and replacing this with a lower powered LED globe. We ordered a LED globe but then COVID put a complete holt on getting the right kind we needed with global delays in postage. Glenn thought he could make one out of spare parts and this is what he did. Several months passed as he went through various iterations of building a globe. During this time I wanted to see what I was shooting as well as start archiving my previously reels. This set me to find alternatives to my telecine plan. I learnt that the UOW library had a Steenbeck and I arranged to use it. Another simple cheap alternative to scanning is using a digital camera to shoot off the screen of a Steenbeck. Using a Steenbeck also has the advantage that the flat bed machine is gentler on the neg. The process is to dim any overhead lights to limit reflection on the monitor and line up the shutter of the digital camera mounted on a tripod so as to reduce flicker as much as possible. The results were good enough for me to make digital copies that helped me document my process and start an archive excel sheet were I noted which camera, film content, development process and so on. COVID made this a difficult solution after more restrictions came in. I was lucky enough to buy a Steenbeck and install it at Hope Studios on campus. This was good for a time (although not ideal as the studio is very bright - good for painters not for screens) but once again COVID has meant greater restrictions and I now can’t go to campus.
Eventually between restrictions in 2020 I picked up the Eiki (thanks Glenn!) and since I had the Steenbeck solution I didn’t end up using it (sorry about that Glenn!). When the news came that campus would be closed I made a dash to the studio to pickup the Eiki projector (thanks again Glenn!). Since then I have been testing out the results, which are thus:
1. Hard to reduce flicker (produced by the projector shutter)
2. Hard to reduce strobing lines (LED lights turn on and off very fast)
3. Hard to get my macro lens close enough to the film gate to get the best resolution possible.
4. My camera being only HD is not quite up to the task to compensate for the above
5. 16mm projectors are not kind to film neg because they run at least 18fps.
The solution to the above is to buy a 4K camera and a lens adapter for my macro lens and disable the LED globe in such a way that it doesn’t turn on and off or build a DIY telecine from spare parts of a film gate, an Arduino motor controller and my current camera (it can shoot over 20 MB per still frame). I am tempted to go the Ardunio root but know this will be another slow process but perhaps worth it to have my own scanner.
Chasing DIY analogue to digital solutions have got me thinking about other themes for working with analogue in the current digital age:
1. Analogue film processes rely on the kindness of specialised technicians
2. This is a good time to find cheap (comparatively speaking) solutions for digital processes
3. Open source software and hardware is key to supporting and developing artist processes
4. Hacking or repairing what is available and building knowledge about what goes on inside machines has always been part of film makers tool/skill set.
0 notes
Text
Eyecam is a creepy webcam shaped like a human eye
How much of what you did today has been monitored and recorded? If you don’t know, or haven’t considered it, then this anthropomorphic webcam by researchers at Saarland University in Germany might just start up that mental conversation. That’s because their Eyecam is always watching.
The device looks like an incredibly realistic eyeball, complete with surrounding flesh, eyelids, and an eyebrow. Inside is a series of six servo motors that allow it to gaze around the room and emote, under the control of an Arduino Nano. The Eyecam also includes a tiny HD camera, which is fed into a Raspberry Pi Zero to be recognized by a computer as a plug-and-play webcam.
It’s definitely strange and thought-provoking, and build files are even available if you’d like to construct your own!
youtube
Image credit: Marc Teyssier
The post Eyecam is a creepy webcam shaped like a human eye appeared first on Arduino Blog.
Eyecam is a creepy webcam shaped like a human eye was originally published on PlanetArduino
0 notes
Link
Arduino Drone With GPS #QuadcopterDrones #bestvaluedronewithhdcamera - best value drone with hd camera - https://arduino.eemuhendis.com/?p=440
0 notes
Photo

DJI goggles were sold out recently. They're now back. You can not only see live HD feed from your drone's camera, you can also watch movies and hook up your PS4 to it. Get it here while supplies last: http://www.tinyurl.com/djigoggles | #djiphantom4 #djiglobal #uav #gopro #3drobotics #djiinspire1 #quadcopter #miniquad #djiphantom3 #robotics #robot #aerialphotography #fpv #drones #hexacopter #octocopter #tricopter #djiphantom #arduino #hobbyking #drone #multirotor #dronephotography #rcplane #spacex #sparkfun #adafruit #nasa #raspberrypi #mavicpro (at MUSEUM OF ICE CREAM)
#hobbyking#djiphantom4#raspberrypi#spacex#mavicpro#sparkfun#hexacopter#djiphantom#octocopter#djiphantom3#djiglobal#robot#fpv#3drobotics#djiinspire1#adafruit#drone#drones#dronephotography#uav#robotics#gopro#quadcopter#arduino#nasa#aerialphotography#multirotor#tricopter#rcplane#miniquad
4 notes
·
View notes
Text
Of Mirrorless Cameras & Millenials

Hello friend!
It’s been a long time since I’ve indulged myself in Google searches and YouTube videos regarding cameras and photography. There’s really nothing I can do at this point except read up on the features of the cameras I want and compare them with other models and brands because I currently do not have enough money to buy one. It was around this time last year when I made a deal with my mom. I remember sending her a link to several of the cameras I want and telling her that I’d do everything just to get my hands on one of those. Of course, I linked her the cheapest yet decent camera I could find on the Internet. Some of the links were even of second hand cameras because that’s how I badly want one. I remember her telling me to achieve a certain GWA and I remember agreeing. Like I expected, I didn’t get the GWA she wanted that semester.
I’m doing my best in my computer science subjects this semester. I’m currently learning the basics of C and Java, which the university offers along with my curriculum. I’m also learning Arduino, Unity and Blender basics with a few of my colleagues since these things are not included within the scope of my curriculum. It’s fun learning things I’ve always wanted to learn ever since high school. However, as much as I love learning how to code, program and run electronics, I miss photography.
Using the iPad mini which I got as a gift for doing well in school way back in second year of high school, I remember that I would randomly go to different places like the city library and just take pictures of things and scenes. I love cinematography and I love understanding its beauty. It’s beautiful how things can look different but at the same time identical when viewed from the lens of a camera or the screen of an electronic device. I’ve always loved the aesthetic side of things, always looking out for angles that would look good in both video and photo. I love photography and as much as I love it, I don’t have the right equipment to professionally pursue it.
Old photos I took using the iPad mini (2013):


Studying at the premiere state university in the country has exposed to me to different people who excel at their respective fields. I’ve met people (who, in this age, call themselves the millenials) who are in bands, people who started their own art events, people who write so well that every time I hear of their latest writings, the writer in me starts emerging once again. It’s a beautiful place to meet people who are creative and goal-oriented enough to actually pursue their passions.
With the boom of the digital age, I’ve noticed that most of the people I’ve met resort to posting their works online. It’s the age of digital media and social media is the easiest way these days to capture someone’s attention and eventually gather an audience. I came across a Facebook post regarding a Sony Alpha A5000 giveaway and thought that, like all the people I’ve met, it’s time for me to start working on something I love.
In this post I’ll be pairing up the features of the Sony Alpha A5000 with some of types of millenials I’ve met in my university.

FOR THE BUDDING PHOTOGRAPHERS & BLOGGERS:
1. 20.1 AP Exmor HD APS Sensor:
This remarkable sensor has all the elements for world-class images: top sensitivity, extreme dynamic range, unsurpassed detail, and low noise.
This feature will help millenials take that perfect shot during org events, university fairs or during weekend night outs at pubs and gathering with friends.
2. Pop Up Flash
Low light situations are not a problem
Built-in pop-up flash in a compact camera body is perfect when an extra burst of light is needed to get the shot. Combine with high ISO sensitivity—from 100 to 16000 ISO—to enable shooting in just about any setting.
Will help you get that beautiful shot at night while walking around campus or along the busy streets of the city. Even without this feature, the camera still comes with high sensitivity which allows you to get great shots even in low light settings.
3. Power Zoom Lens with Motor Zoom Lever
Convenient power zoom lens with motor zoom lever and body control_
A convenient zoom lever on the body of the camera allows for effortless one-handed operation and smooth zooming even when shooting self-portraits, bringing compact camera convenience to the realm of interchangeable-lens models.
The zoom feature of the Sony Alpha A5000 is perfect to use when millenials are in events such as concerts, festivals or anything that needs to be shot in greater detail. It also comes with the collapsible and lightweight 16-50mm kit lens which is perfect to bring around the city and university campuses.
4. Face Detection/Smile Shutter
Set the α5000 to recognize faces and smiles. Face Detection locates up to eight faces in a composition, then adjusts exposure, white balance, and other settings based on these faces. Smile Shutter—adjustable with three levels—automatically takes a shot when smiles in the scene are detected.
Perfect companion to bring during group night outs with the gang.
5. Tiltable LCD Screen
Beautifully composed self-portraits made easy.
The α5000’s tiltable LCD screen flips up 180° to make shooting self-portraits a snap. Include other people, experiment with interesting angles or shoot against famous landmarks. When you press the shutter, the camera does all the work.
In this age, where everyone is always in the mood to get the perfect selfie, the Sony Alpha A5000 is the perfect camera to bring around with you especially during trips. Tilt the LCD screen and take that groupie with your friends!

FOR THE OTHER CREATIVES (filmmakers, artists, videographers, vloggers):
6. Scene Selection
Optimize image quality for the type of scene you shoot by choosing one of nine Scene Selection modes, including Portrait, Sports Action, and Macro.
Create beautiful hand-held evening shots with minimal blur and noise by activating this advanced Scene Selection mode.
This feature will allow you to produce a variation of incredible shots taken with great detail.
7. Anti Motion Blur
This feature enhances clarity by reducing subject motion blur, which tends to occur in dimly lit scenes or when shooting at telephoto settings.
This is perfect during late night car rides with your friends or during amusement rides where everything is moving too fast. Take out your Sony Alpha A5000 and capture that moment in time.
8. Sweep Panorama
Just sweep the camera when shooting to capture spectacular panoramic landscapes that can be enjoyed on the LCD screen or a wide-screen TV.
Take the Sony Alpha A5000 with you during trips and remember to capture the beautiful scenery in an incredible panorama display.

9. One Touch Remote & One Touch Sharing
One-touch remote lets you use your smartphone or tablet as a viewfinder and remote control for a digital camera, and one-touch sharing lets you transfer your photos and videos from your camera. Either way, by installing the PlayMemories Mobile app to your NFC-enabled Android smartphone or tablet, you can avoid complex set-up sequences and establish wireless connection simply by touching your device to the camera. You are now ready to control your camera from your smartphone to take a photo from a previously out-of-reach spot, or simply be in your own group shot, as well as transfer them instantly to your smartphone for sharing on SNS. No NFC? No problem. You can also pair the devices manually.
10. Works with iMovie and Final Cut Pro
This product is compatible with Final Cut Pro X and iMovie.
Perfect for when importing videos to the Mac for university projects and presentations.
11. D-Range Optimizer
DRO is another way to tame high-contrast scenes for more natural looking images. Unlike Auto HDR, it can be used when photographing moving subjects, even during high-speed continuous shooting.
12. Up to 420 shots of battery life
Take up to 420 shots on a single charge with Sony® lithium ion Stamina™ battery power. Sony's InfoLITHIUM™ battery system enables you to see the percent of power remaining, so you can keep shooting in confidence.
The perfect camera for when millenials need to cover events that lasts for a couple hours.
13. Bionz X Image Processing Engine
Expect superlative results with Sony’s latest processing engine: truer color rendering, better noise reduction, and faster burst mode shooting.
All in all, the Sony Alpha A5000 seems to be like the perfect camera that I need to pursue my passion for photography and videography. It’s also the perfect companion for other millenials like me since it is compact and lightweight but is equipped with components similar to what we can find in entry-level cameras.
Hoping to have one soon and hopefully influence others through the photos that I will take, one shot at a time :)
- Jusie
Sources:
http://www.sony.com.ph/electronics/interchangeable-lens-cameras/ilce-5000-kit/specifications#features
_http://www.sony.com.ph/electronics/interchangeable-lens-cameras/ilce-5000-kit?cid=[a5000]PH-Alpha_a5000:sem:goog:PH:txt_brand:sony_a5000&gclid=CKjb9_3J9dICFZcSvQodba4Ncg
2 notes
·
View notes
Text
UNINTERRUPTED AND REMOTE CONTROLLING OF SMART DEVICES
UNINTERRUPTED AND REMOTE CONTROLLING OF SMART DEVICES
Uninterrupted and Remote controlling of smart devices
How many of us wondered if we had turned off the gas or switched off the heater after leaving our houses? It is likely that the number in affirmation is going to be pretty high. While these little mind tricks are common to us all, in today’s modern, technologised households, the dilemma has taken a novel turn.
Many of us are dependent on the…
View On WordPress
#advantages and disadvantages of smart homes#app control switch#arduino thesis pdf#arduino uno project documentation#benefits of smart homes#bluetooth based home automation using arduino#electric wifi#home automation switches india#home automation using arduino and android pdf#home automation using arduino and wifi pdf#home depot home security#home security blogs uk#how do smart homes work#introduction to home automation#iot smart home project#login vector#residential lighting control systems#security vector#smart hd wifi camera#smart home doorbell#smart home introduction#smart homes technology#smart lighting products#smart switch amazon#switch with wifi#UNINTERRUPTED AND REMOTE CONTROLLING OF SMART DEVICES#vector security blog#vector tech support#wifi electrical switch india#wireless ceiling light home depot
0 notes
Text
2018-03-21 21 ANDROID now
ANDROID
Android Advices
HTC Desire 12+ and Desire 12 Smartphones Announced with HD+ Displays
Sony Xperia L2 and XA2 series starts receiving new updates
LG Zone 4 budget friendly Smartphone now available via Verizon for $115 on prepaid
Oppo R15 Announced with 20MP front camera, 6GB RAM and Android 8.1
Samsung Galaxy S9 and S9+ Launch on AT&T, Sprint, T-Mobile and Verizon today
Android Authority
It’s now way easier to go live on YouTube
IDC: Smartwatches aren’t dead just yet
Galaxy S9 Plus costs less to manufacture than iPhone X
Messaging app Telegram must give encryption keys to Russia
Want to triple your reading speed?
Android Central
How often do you charge your Galaxy S9/S9+?
Qualcomm wants to make 'XR' a thing with its future-forward developer kit
OnePlus 5T: News, Specs, Problems, and next-gen rumors!
Galaxy S9 Tips: First 9 things to do with your new S9 or S9+
Huawei P20: Rumors, specs, availability, and more!
Android Developers
Introduction to Wear OS Application Development
Introducing Google Play Instant
Introduction to Wear OS by Google Development
Android Developer Story: Homage finds success on Google Play with Start on Android
Google Play: Keep building (Stories from successful startup founders)
Android Guys
Master & Dynamic teams up with Leica again for some exclusive headphones
Eight alternative SMS apps for Android
8 Ball Pool review: Head to the pool hall with a casual game of billiards
Become an Arduino master for whatever you’re willing to pay
FrontRow Camera review: A nice toy, but no game-changer
Android Headlines
First OPPO R15 Real-Life Images Surface In China
Taipei Intros First Testing Facility For Autonomous Vehicles
AT&T Starts Updating Galaxy S8, S8 Plus To Android 8.0 Oreo
Indian Teenager Killed By Mobile Phone Explosion
Meizu E3 Announced With SD636, Dual Cameras & 6GB Of RAM
Android Police
Over 85 Android apps and games have added augmented reality elements thanks to ARCore
Google Phone v18 switches to system settings for sound and vibration controls [APK Download]
Amazon tops Google to become the second most valuable company in the world
Google doubles down on efforts to fight the spread of 'fake news'
You'll soon be able to start a YouTube livestream directly from within the camera app
Droid Life
The Latest Android Minis Remind Me of Peeps and That Makes Me Hungry
YouTube TV Adds Two New Markets
AT&T Galaxy S8 Now Also Receiving Oreo Update
Google’s White Framed Adaptive Icons Sure are Pissing Off Galaxy S8 Owners Who Just Got Oreo
Keeper Password Manager Now Fully Integrated With Autofill in Android 8.1
Reddit Android
Introducing the LineageSDK
Sources: Google is buying Lytro for about $40M
Samsung Electronics Diversifies its 8-Inch Foundry Offerings with New RF/IoT and Fingerprint Technology Solutions
WhatsApp co-founder tells everyone to delete Facebook
Consumers are spending more time on larger devices
TechCrunch Android
8bitdo’s wireless adapter adds flexibility to Xbox, PlayStation and Switch controllers
Insta360 One gets a massive upgrade with FlowState stabilization
Waze Carpool expands to the entire state of Washington
Rylo’s shoot first, frame later camera is ideal for casual adventure-seekers
Anker’s Nebula Capsule portable projector is a pocket powerhouse
0 notes
Text
The New DJI Robot is Insane: Introducing the Robomaster EP Core
Our verdict of the DJI Robomaster EP Core: The most powerful STEAM learning robot ever. A comprehensive education toolkit and curriculum for both Scratch and Python programming is provided, and further expansion is possible with various microcontrollers and sensors.1010
You probably think of DJI as that drone company, but they’ve actually turned their engineering geniuses to a lot more than just drones. The DJI Robomaster EP Core is the next generation of intelligently programmable, remote-controlled, or entirely autonomous robots. It’s insanely good fun, a great learning experience, and I’m completely smitten with it.
Read on to find out more.
Robomaster EP Core: At a Glance
Omnidirectional movement via Mecanum wheels and custom servo motors with 250Nmm torque.
Four hit detectors (impact or laser) with RGB ring lights.
2-axis grabber.
2400mAh battery (around 1-hour battery life).
HD camera, microphone, and onboard speaker.
Micro-SD card slot.
Local Wi-Fi or router connectivity.
Proximity sensor.
Dimensions: H13 x W10 x L15.5 inches (H33 x W25 x L39 cm) with grabber fully retracted.
Weight: 7lbs 8oz (3.4kg).
Expandable with Raspberry Pi, Arduino, micro:bit, or NVIDIA Jetson; sensor adaptors provided.
FPV remote control via desktop or smartphone app.
Scratch or Python programming.
Curriculum and structured competitive modes.
Note: we received an engineering sample for testing. Contents and build guide may differ, and we didn’t have access to the full educational curriculum, only the existing Robomaster app (which is primarily designed for the Robomaster S1 Series).
Building the Robomaster EP Core
Before you can really get started, the Robomaster EP Core package arrives in an enormous box consisting of five trays of parts. That’s right: it’s flat-packed and you’ll need to build it yourself. That would the Engineering part of the STEAM learning experience.
It took me a good half-day of solid build time to get this put together (which you can see in the video review compressed down to about a minute!).
Thankfully the instructions are detailed, and despite two full trays of screws and bolts, each part is labeled well and at no point was I confused about where something ought to be placed.
If you can build some Ikea furniture, you can do this. Just be sure to pick the right screw from the right part of the tray.
Getting Started
You can connect to the Robomaster either via a local Wi-Fi, or by allowing the Robomaster to connect to your router. The latter is preferable, as it allows you to access the Robomaster from any networked client for truly remote control and programming.
A desktop version of the software is available for Mac or PC, though it appears to be a direct port of the mobile app, and runs full-screen.
A switch on the side of the grey controller box selects which mode to operate in. Simply type in your Wi-Fi password to the app so it can generate a QR code. The camera mounted on the Robomaster will then read this, and connect to the network.
Note that the Robomaster is unable to roam between enterprise Wi-Fi access points, so you should use a single high powered router or ensure adequate coverage in the location you’ll be operating the Robomaster. Driving down my hallway resulted in the Robomaster disconnecting from one Unifi access point and pausing for a few seconds as it reconnected through another.
Robomaster Chassis
There are two main parts to the build. The first is the wheels and chassis. We’ll talk more about the “Mecanum” wheels in a moment, but the chassis itself is built around a large solid metal frame, which includes extra mounting points for your own 3D printed parts, accessories, or additional sensors.
The front half has a slight suspension on it, allowing it to traverse small bumps with ease.
This chassis houses the battery as well as the power distribution board and communication bus. It’s this that you’ll plug everything in to. The battery is removable, and spares can be purchased. Each charge lasted me about an hour of constant use.
The 2400mAh battery can be swapped easily and spares purchased separately.
One outstanding feature of the Robomaster EP Core is the four Mecanum wheels. Each wheel is driven by its own powerful custom DJI servo.
Rather than a traditional rubber tire, these wheels has a set of twelve freely-rotating rollers, mounted at a 45-degree offset. Confused? I don’t blame you.
This curious arrangement of rollers on the wheel means that simply rotating the wheel actually forces it to move sideways instead. In order to create the normal forward or backward motion, you need another Mecanum wheel with its rollers mounted in the opposite direction. When both wheels are then rotated in the same direction, the sideways forces cancel each other out, and the chassis actually moves forward or backward as intended.
However, the magic comes when each wheel is driven in opposite directions, both creating the same sideways motion instead. With four such wheels mounted in this configuration, the Robomaster can both strafe left and right, and rotate 360-degrees on the spot. This is called omnidirectional movement. And it’s nothing short of amazing.
If you haven’t already watched the review video to see this in action, you really need to go do that now. Go on, I’ll wait.
This isn’t just incredible to watch though, it also opens up so many more programming possibilities for maneuvering because of the precision involved.
It also adds more interest to the remote control aspect. Maneuvering now requires two analog joysticks, rather than an accelerate and brake pedal, and steering wheel. Anyone familiar with first-person shooter games will feel at home immediately. You can strafe around a target in a circle, for instance, or easily drift around corners. The Robomaster EP Core is highly agile in tight spaces, and racing this thing is immensely fun.
Stop having fun though: this is a learning experience!
Grabber
Mounted on top of the chassis are the grabber attachment and grey controller box. The controller handles Wi-Fi communication, as well as the micro-SD card for recordings.
Powered by three strong servos, the grabber can lift up and down, push or pull, as well as pinch in or expand its rubber claws. Obviously the first thing I did was to grab a courgette and lug it around the kitchen for a while.
This is a screenshot from a video taken using the on-board camera.
When fully extended, the lifting power of the servo is limited, so you may need to pull an object in closer before it can be lifted up again. It’s reasonably powerful and was able to lift up some small blocks of wood or toy cones, but struggled with an iPhone 6 Plus (which is about 6 ounces).
Robomaster doing a spot of weeding with the grabber.
The Robomaster App
While a separate SDK is available and will likely be used for parts of the curriculum, your initial point of contact with the robot will be via the Robomaster app (for iOs, Android, Mac, or Windows). Launch this and you’ll be greeted with three choices:
Solo
Battle
Lab
Solo mode is for simple remote control. Use the joystick on the left to move forward, backward, and strafe. Drag left or right on the screen to rotate. Click the grabber button to bring up that control interface. The main screen area is taken up by the wide-angle first-person-view from Robomaster’s camera. You can also record a number of audio clips to playback on the robot. These are saved to the hardware and can be recalled or set on a loop with hilarious consequences.
The button for follow mode sadly does nothing without the gimbal attached. To move the camera view up or down, you’ll need to manipulate the grabber arm that it’s attached to. The health bar also doesn’t do much unless you’re being pursued by a Robomaster S1 equipped with a laser gun (not even kidding–that’s a thing).
Battle mode is a more structured FPV combat or race event. Without the gimbal and gel bead or laser gun, the battle type aren’t relevant, but the race mode can still be used. By placing the included visual markers around your track, Robomasters must visit each marker in order, which behave as checkpoints. A bonus marker can also be hidden for extra points. The AI recognition system will immediately identify any it sees (though I found this only worked with good lighting), and after visiting each one in turn for the required number of laps, you’re given a resulting time.
Camera and FPV
Unsurprisingly for a company known to produce superb quality video drones, the FPV camera mounted on top of the grabber is also superb.
With an f2.4 aperture and wide 120-degree field of view, I found video transmission to be rock solid and perfectly clear, though this will depend largely on your router and Wi-Fi performance. You can record HD video to a micro-SD card too (not included), which includes audio.
A screengrab from the on-robot camera.
Finally, the Lab is where you can learn all the Robomaster functions, as well as jump right into Python or Scratch coding. Road to Mastery consists of 11 guided Scratch tutorials. DIY Programming presents you with some ready-made Python or Scratch code examples or allows to start afresh. Robo Academy is really just three web links, taking you directly the developer documentation, video tutorials, and programming guide.
Again though, many of these resources rely on the gimbal attachment, so I wasn’t able to fully complete all of these with the EP Core. They’re still beneficial to run through however, and you may find you can convert many of the instructions for use with the grabber alone. The curriculum included with EP Core purchases will be tailored to the grabber.
Scratch Programming the Robomaster EP Core
Now taught to all school children from primary ages and up, Scratch is a visual block programming language that’s surprisingly powerful. The custom Robomaster GUI includes buttons to either bring up a first-person view (to drive the robot back tot he start position before running code again, for instance), and a debug overview of currently defined variables. As the robot runs through programs, blocks of code are highlighted, so it’s easy to follow along and see exactly what’s going on. You can even convert your Scratch program to Python code at any point if you’d rather.
I haven’t actually used Scratch before–the best I had in school was some a BBC Micro Turtle, with BASIC programming. I was pleasantly surprised at how easy it is to pick up, and how much of the Robomaster’s systems are exposed to graphical programming. The “Smart” block section includes things like action for when a visual marker is recognized in view, or when a number of claps are identified.
Robomaster S1 vs EP Core
Robomaster S1 was released last year and is available to purchase for all consumers. It features the same Mecanum wheeled chassis as the EP Core, but doesn’t have as any extensibility when it comes to additional power ports, sensor adaptors, or communications facilities for Arduino, micro:bit, or Raspberry Pi. It’s a more simple remote control and programmable robot, than an entire engineering platform.
The most noticeable difference is that the S1 featured a gel-bead and laser shooter mounted on a gimbal (“Warrior mode”), which could be used for Robomaster battles, or to shoot the included vision marker targets.
Instead, the EP Core instead uses a more education-focused (or school-friendly) grabber attachment, which DJI calls “Engineering mode”.
The EP Core also has a full curriculum for all suitable year groups to follow (though we haven’t had access to that so can’t comment further on it).
While many of the Robomaster app tutorials are currently reliant on having the gimbal attachment, the remote control element and programming components are all there for use with the grabber.
The other difference is pricing: Robomaster S1 can be purchased for around $500 from numerous stockists. The EP Core is only available through educational partners, or via direct inquiry to DJI. I couldn’t draw them on exact pricing (presumably there are bulk discounts for schools), but given the similarity to the S1, I wouldn’t have thought it was too far off the $500 mark.
Robomaster S1 Robomaster S1 Buy Now On Amazon $549.00
Is This the Ultimate STEAM Learning Tool?
In a word, yes.
The only slight frustration is that you can’t currently follow all of the Robomaster app tutorials. It’s not clear if these will be expanded to cover more of the grabber functionality, but the full curriculum will be tailored toward it and included with all purchases.
I’m quite envious of any lucky students who have the opportunity to learn to program using the EP Core. It’s simply an incredible learning tool. Sure you could learn Scratch without a cool robot to drive around, but it’s a whole lot more motivating to have that real hardware react to your programming. The EP Core model includes expansion ports and mounting holes for additional sensors and development boards, such as the Raspberry Pi, Arduino, or even NVIDIA’s Jetson Nano.
For pricing, you’ll need to enquire directly with DJI or via their local educational providers. Alternatively, if the expansion capabilities aren’t a concern and you’d rather the gimbal-mounted gel-bead and laser shooter instead of a grabber, check out the Robomaster S1, which is widely available.
Read the full article: The New DJI Robot is Insane: Introducing the Robomaster EP Core
The New DJI Robot is Insane: Introducing the Robomaster EP Core posted first on grassroutespage.blogspot.com
0 notes
Text
The New DJI Robot is Insane: Introducing the Robomaster EP Core
Our verdict of the DJI Robomaster EP Core: The most powerful STEAM learning robot ever. A comprehensive education toolkit and curriculum for both Scratch and Python programming is provided, and further expansion is possible with various microcontrollers and sensors.1010
You probably think of DJI as that drone company, but they’ve actually turned their engineering geniuses to a lot more than just drones. The DJI Robomaster EP Core is the next generation of intelligently programmable, remote-controlled, or entirely autonomous robots. It’s insanely good fun, a great learning experience, and I’m completely smitten with it.
Read on to find out more.
Robomaster EP Core: At a Glance
Omnidirectional movement via Mecanum wheels and custom servo motors with 250Nmm torque.
Four hit detectors (impact or laser) with RGB ring lights.
2-axis grabber.
2400mAh battery (around 1-hour battery life).
HD camera, microphone, and onboard speaker.
Micro-SD card slot.
Local Wi-Fi or router connectivity.
Proximity sensor.
Dimensions: H13 x W10 x L15.5 inches (H33 x W25 x L39 cm) with grabber fully retracted.
Weight: 7lbs 8oz (3.4kg).
Expandable with Raspberry Pi, Arduino, micro:bit, or NVIDIA Jetson; sensor adaptors provided.
FPV remote control via desktop or smartphone app.
Scratch or Python programming.
Curriculum and structured competitive modes.
Note: we received an engineering sample for testing. Contents and build guide may differ, and we didn’t have access to the full educational curriculum, only the existing Robomaster app (which is primarily designed for the Robomaster S1 Series).
Building the Robomaster EP Core
Before you can really get started, the Robomaster EP Core package arrives in an enormous box consisting of five trays of parts. That’s right: it’s flat-packed and you’ll need to build it yourself. That would the Engineering part of the STEAM learning experience.
It took me a good half-day of solid build time to get this put together (which you can see in the video review compressed down to about a minute!).
Thankfully the instructions are detailed, and despite two full trays of screws and bolts, each part is labeled well and at no point was I confused about where something ought to be placed.
If you can build some Ikea furniture, you can do this. Just be sure to pick the right screw from the right part of the tray.
Getting Started
You can connect to the Robomaster either via a local Wi-Fi, or by allowing the Robomaster to connect to your router. The latter is preferable, as it allows you to access the Robomaster from any networked client for truly remote control and programming.
A desktop version of the software is available for Mac or PC, though it appears to be a direct port of the mobile app, and runs full-screen.
A switch on the side of the grey controller box selects which mode to operate in. Simply type in your Wi-Fi password to the app so it can generate a QR code. The camera mounted on the Robomaster will then read this, and connect to the network.
Note that the Robomaster is unable to roam between enterprise Wi-Fi access points, so you should use a single high powered router or ensure adequate coverage in the location you’ll be operating the Robomaster. Driving down my hallway resulted in the Robomaster disconnecting from one Unifi access point and pausing for a few seconds as it reconnected through another.
Robomaster Chassis
There are two main parts to the build. The first is the wheels and chassis. We’ll talk more about the “Mecanum” wheels in a moment, but the chassis itself is built around a large solid metal frame, which includes extra mounting points for your own 3D printed parts, accessories, or additional sensors.
The front half has a slight suspension on it, allowing it to traverse small bumps with ease.
This chassis houses the battery as well as the power distribution board and communication bus. It’s this that you’ll plug everything in to. The battery is removable, and spares can be purchased. Each charge lasted me about an hour of constant use.
The 2400mAh battery can be swapped easily and spares purchased separately.
One outstanding feature of the Robomaster EP Core is the four Mecanum wheels. Each wheel is driven by its own powerful custom DJI servo.
Rather than a traditional rubber tire, these wheels has a set of twelve freely-rotating rollers, mounted at a 45-degree offset. Confused? I don’t blame you.
This curious arrangement of rollers on the wheel means that simply rotating the wheel actually forces it to move sideways instead. In order to create the normal forward or backward motion, you need another Mecanum wheel with its rollers mounted in the opposite direction. When both wheels are then rotated in the same direction, the sideways forces cancel each other out, and the chassis actually moves forward or backward as intended.
However, the magic comes when each wheel is driven in opposite directions, both creating the same sideways motion instead. With four such wheels mounted in this configuration, the Robomaster can both strafe left and right, and rotate 360-degrees on the spot. This is called omnidirectional movement. And it’s nothing short of amazing.
If you haven’t already watched the review video to see this in action, you really need to go do that now. Go on, I’ll wait.
This isn’t just incredible to watch though, it also opens up so many more programming possibilities for maneuvering because of the precision involved.
It also adds more interest to the remote control aspect. Maneuvering now requires two analog joysticks, rather than an accelerate and brake pedal, and steering wheel. Anyone familiar with first-person shooter games will feel at home immediately. You can strafe around a target in a circle, for instance, or easily drift around corners. The Robomaster EP Core is highly agile in tight spaces, and racing this thing is immensely fun.
Stop having fun though: this is a learning experience!
Grabber
Mounted on top of the chassis are the grabber attachment and grey controller box. The controller handles Wi-Fi communication, as well as the micro-SD card for recordings.
Powered by three strong servos, the grabber can lift up and down, push or pull, as well as pinch in or expand its rubber claws. Obviously the first thing I did was to grab a courgette and lug it around the kitchen for a while.
This is a screenshot from a video taken using the on-board camera.
When fully extended, the lifting power of the servo is limited, so you may need to pull an object in closer before it can be lifted up again. It’s reasonably powerful and was able to lift up some small blocks of wood or toy cones, but struggled with an iPhone 6 Plus (which is about 6 ounces).
Robomaster doing a spot of weeding with the grabber.
The Robomaster App
While a separate SDK is available and will likely be used for parts of the curriculum, your initial point of contact with the robot will be via the Robomaster app (for iOs, Android, Mac, or Windows). Launch this and you’ll be greeted with three choices:
Solo
Battle
Lab
Solo mode is for simple remote control. Use the joystick on the left to move forward, backward, and strafe. Drag left or right on the screen to rotate. Click the grabber button to bring up that control interface. The main screen area is taken up by the wide-angle first-person-view from Robomaster’s camera. You can also record a number of audio clips to playback on the robot. These are saved to the hardware and can be recalled or set on a loop with hilarious consequences.
The button for follow mode sadly does nothing without the gimbal attached. To move the camera view up or down, you’ll need to manipulate the grabber arm that it’s attached to. The health bar also doesn’t do much unless you’re being pursued by a Robomaster S1 equipped with a laser gun (not even kidding–that’s a thing).
Battle mode is a more structured FPV combat or race event. Without the gimbal and gel bead or laser gun, the battle type aren’t relevant, but the race mode can still be used. By placing the included visual markers around your track, Robomasters must visit each marker in order, which behave as checkpoints. A bonus marker can also be hidden for extra points. The AI recognition system will immediately identify any it sees (though I found this only worked with good lighting), and after visiting each one in turn for the required number of laps, you’re given a resulting time.
Camera and FPV
Unsurprisingly for a company known to produce superb quality video drones, the FPV camera mounted on top of the grabber is also superb.
With an f2.4 aperture and wide 120-degree field of view, I found video transmission to be rock solid and perfectly clear, though this will depend largely on your router and Wi-Fi performance. You can record HD video to a micro-SD card too (not included), which includes audio.
A screengrab from the on-robot camera.
Finally, the Lab is where you can learn all the Robomaster functions, as well as jump right into Python or Scratch coding. Road to Mastery consists of 11 guided Scratch tutorials. DIY Programming presents you with some ready-made Python or Scratch code examples or allows to start afresh. Robo Academy is really just three web links, taking you directly the developer documentation, video tutorials, and programming guide.
Again though, many of these resources rely on the gimbal attachment, so I wasn’t able to fully complete all of these with the EP Core. They’re still beneficial to run through however, and you may find you can convert many of the instructions for use with the grabber alone. The curriculum included with EP Core purchases will be tailored to the grabber.
Scratch Programming the Robomaster EP Core
Now taught to all school children from primary ages and up, Scratch is a visual block programming language that’s surprisingly powerful. The custom Robomaster GUI includes buttons to either bring up a first-person view (to drive the robot back tot he start position before running code again, for instance), and a debug overview of currently defined variables. As the robot runs through programs, blocks of code are highlighted, so it’s easy to follow along and see exactly what’s going on. You can even convert your Scratch program to Python code at any point if you’d rather.
I haven’t actually used Scratch before–the best I had in school was some a BBC Micro Turtle, with BASIC programming. I was pleasantly surprised at how easy it is to pick up, and how much of the Robomaster’s systems are exposed to graphical programming. The “Smart” block section includes things like action for when a visual marker is recognized in view, or when a number of claps are identified.
Robomaster S1 vs EP Core
Robomaster S1 was released last year and is available to purchase for all consumers. It features the same Mecanum wheeled chassis as the EP Core, but doesn’t have as any extensibility when it comes to additional power ports, sensor adaptors, or communications facilities for Arduino, micro:bit, or Raspberry Pi. It’s a more simple remote control and programmable robot, than an entire engineering platform.
The most noticeable difference is that the S1 featured a gel-bead and laser shooter mounted on a gimbal (“Warrior mode”), which could be used for Robomaster battles, or to shoot the included vision marker targets.
Instead, the EP Core instead uses a more education-focused (or school-friendly) grabber attachment, which DJI calls “Engineering mode”.
The EP Core also has a full curriculum for all suitable year groups to follow (though we haven’t had access to that so can’t comment further on it).
While many of the Robomaster app tutorials are currently reliant on having the gimbal attachment, the remote control element and programming components are all there for use with the grabber.
The other difference is pricing: Robomaster S1 can be purchased for around $500 from numerous stockists. The EP Core is only available through educational partners, or via direct inquiry to DJI. I couldn’t draw them on exact pricing (presumably there are bulk discounts for schools), but given the similarity to the S1, I wouldn’t have thought it was too far off the $500 mark.
Robomaster S1 Robomaster S1 Buy Now On Amazon $549.00
Is This the Ultimate STEAM Learning Tool?
In a word, yes.
The only slight frustration is that you can’t currently follow all of the Robomaster app tutorials. It’s not clear if these will be expanded to cover more of the grabber functionality, but the full curriculum will be tailored toward it and included with all purchases.
I’m quite envious of any lucky students who have the opportunity to learn to program using the EP Core. It’s simply an incredible learning tool. Sure you could learn Scratch without a cool robot to drive around, but it’s a whole lot more motivating to have that real hardware react to your programming. The EP Core model includes expansion ports and mounting holes for additional sensors and development boards, such as the Raspberry Pi, Arduino, or even NVIDIA’s Jetson Nano.
For pricing, you’ll need to enquire directly with DJI or via their local educational providers. Alternatively, if the expansion capabilities aren’t a concern and you’d rather the gimbal-mounted gel-bead and laser shooter instead of a grabber, check out the Robomaster S1, which is widely available.
Read the full article: The New DJI Robot is Insane: Introducing the Robomaster EP Core
The New DJI Robot is Insane: Introducing the Robomaster EP Core published first on http://droneseco.tumblr.com/
0 notes
Link
Tempo wants to be the Peloton of barbells. It’s a 42-inch tall screen with 3D machine vision that tracks and teaches you as you workout. The giant upright HD display makes it feel like your personal trainer is right there with you while you compete with others in live and on-demand classes.
Tempo’s Microsoft Kinect-esque motion sensors scan you 30 times per second and notify you if your form is wrong. It’s all housed in a sleekly designed free-standing cabinet that neatly stores the included barbells, dumbbells, attachable weights, workout mat, recovery foam roller, and heartrate monitor.
Tempo opens for pre-orders today for $1995, requiring a $250 deposit and $39 monthly content subscription before shipping this summer.
“Every single product in the market took a piece of equipment out of a gym and slapped a screen on it” says Tempo CEO and co-founder Moawia Eldeeb. “You need to be able to see a user to actually be able to give them guidance so they can work out safely. We wanted to build a fitness experience from the ground up with training and form feedback at the core of it.”
I demo’d Tempo this week and found the in-home convenience, motivational on-screen personal trainers, and the real-time posture corrections gave me the confidence to lift weights without the fear of injury. It might not feel quite as fun and addictive as Peloton, but it offers a facsimile of personal training that’s more affordable than in-person classes that cost $100 or more.
The idea of democratizing access to trainers is what convinced Eldeeb and the Tempo team to stretch its initial $1.8 million in seed funding for four years. While collecting data from its SmartSpot in-gym weight lifting assessment device, Tempo survived long enough to build this prototype.
“Most investors had given up on us. We built this product and had just $700,000 left” Eldeeb recalls. But once people could try Tempo, “we pitched 10 investors and got 9 term sheets. It got very competitive.” The startup recently walked away with a $17.5 million Series A round from Founders Fund, DCM, and Khosla Ventures. Now Tempo will pour that cash into marketing, retail distribution, R&D, and content production.
A founder’s journey out of homelessness
Tempo’s mission is to change people’s lives for the better like personal training did for Eldeeb. “Training is what took me out of a homeless shelter and got me to where I am I today” he reflects.
Tempo co-founder, CEO, and CPO Moawia Eldeeb
Eldeeb’s family immigrated to the US from Egypt when he was nine. But after an explosion leveled their building, they wound up in a homeless shelter. Eldeeb eventually dropped out of middle school to work in a pizza parlor and help pay the bills. But personal trainers at a local YMCA took him under their wing. He eventually paid his way through a computer science degree at Columbia University by working as a personal trainer to his eventual co-founder and CTO Josh Augustin. “Having trainers say you’re getting stronger taught me I could do something for myself.”
While at school, Eldeeb was developing an idea for a physical therapy wearable while Augustin was building 3D sensors for guiding robot perception. They soon realized that a combination of these ideas “offered us the possibility to deliver on the promise of guiding your form and tracking your progress accurately.”
In 2015, they started a company called Pivot to build SmartSpot — a similar looking upright screen that was designed for gyms. It could track users, but only output raw data about their form, like how bent a user’s knees were during a squat. It then worked with trainers to annotate the data to determine what movement patterns were safe and which were dangerous.
Gym owners bought in because it let them track which trainers were actually helping customers improve. “It held trainers accountable. If you weren’t delivering results, it’d be obvious” Eldeeb tells me. The company built up a dataset of over from over 1 million 3D tagged workouts, from hundreds of gyms, overseen by thousands of trainers. That formed the basis of the artificial intelligence that would let Pivot pivot into Tempo.
Pumping Iron With Tempo
At first, Tempo’s giant screen and black or white armoire can feel a bit daunting. The thing is about six feet tall, though it only takes up as much room as a large chair. It makes efficient use of space, with the barbell and dumbbells racked on the back, an internal shelf for the foam roller and mat, and a soft-closing cabinet on the front with the rubber-coated weight set. Keeping everything together means you won’t have to go digging in your closet to start a work out.
Tempo walks users through an initial computer-vision fitness assessment to understand your strength and flexibility so it can set base levels for its exercises. If you have an injury it needs to nurse, Tempo connects you to a human personal trainer that helps customize your workout plan. Otherwise, it uses your goals and data to set out a progressive regimen that gets a little tougher each day. It even blocks you from jumping into later classes so you don’t strain yourself.
Your workout plan begins with tutorial sessions that teach you to do the exercises with safe and proper form. When I was hunching forward during my squats, Tempo’s computer vision would ding me with instant feedback to keep my knees back and chest up. Then once I’d corrected the issue, it congratulated me with little green checkmarks. “Any product that doesn’t offer that is no better than a DVD or YouTube videos” Eldeeb remarks.
From there I could choose between a variety of class styles and lengths, ranging from high intensity interval training circuits to isolated sessions focused on particular muscle groups. In each, you watch a near life-size personal trainer doing the routines right in front of you while they demonstrate form and drop inspirational quotes.
Tempo is producing seven live classes per day from its San Francisco studio which you can also watch on-demand. You can compete against friends or strangers, and Tempo compares you rep for rep so it’s more about perfect form than reckless speed or weight. The live trainers can actually see all your data and your mistakes on a dashboard as they lead classes, and can call you out for screwing up (though you can deactivate this shame mode). Eldeeb says “knowing the trainer can possibly see your numbers will motivate you to actually do this right.”
The class selection interface is suspiciously similar to Peloton’s, though that at least will make it familiar for some. Over time, you build up an immense collection of data on your performance in each work out, excercise, and muscle. Unlike hitting the gym by yourself, you’ll never struggle to remember how much weight to use or whether you’re improving. Classes are soundtracked with dancey remixes sourced from a partnership with Feed.fm to avoid the royalty issues with original songs that slapped Peloton.
Tempo gives feedback when you’re doing exercises wrong, and when you correct yourself
For a 14-person startup, Tempo is trying to do a ton and that can leave some rough edges. The bluetooth armband heartrate monitor can have connectivity issues and the computer vision doesn’t always register every rep, especially if your posture is off. Classes also fail to include enough stretching to prevent strains, instead devoting the start of classes to warmups that ease you in but might not protect your muscles well enough. My quads were destroyed after my demo.
Tempo still achieves its primary objective: it makes weight lifting accessible. No need to drag yourself to the gym or be beholden to a trainer’s schedule, where I’d always end up arriving late and wasting 25% of my session. The form feedback fixes my core complaint about remote personal training app Future I’ve been using for nine months, which can’t see you. That’s led to minor injuries from bad sit-up posture and other incorrect movements. Tempo can’t catch everything, but it can nip some of the most common mistakes in the bud.
Eldeeb was blunt when asked why Tempo is better than well-funded competitors like $3000 Tonal’s wall-mounted resistance cable-based training system or the $1500 Mirror’s massive screen.
“The biggest problem with Tonal is two-fold. Cables and motors do not last. I want this product to be in your house for 10-plus years. [Tempo] is in gyms running 24/7 in for 3 years and it’s still working. The second biggest thing is just feedback.” While Tonal does include a camera and microphone it might employ in the future, it’s not scanning you to detect when you’re lifting weights crooked like Tempo.
As for Mirror, “What is the difference between ClassPass Live and Mirror? It doesn’t come with any equipment, and there’s no training. It’s just a two-way mirror and a Samsung LED panel behind it with an arduino board” Eldeeb rails. He claims it can’t actually monitor your workouts and that his team’s tests found Mirror would say they’d burned 500 calories when they were literally just sitting on their couch in front of it.
Eldeeb demos Tempo
If the software proves to have high retention so people actually recommend Tempo to friends, the biggest hurdle will be its price. You can buy a couple dumbbells for $50 or get a barbell weight bench for a few hundred. Even if Tempo’s $55 per month financing option plus $39 subscription makes it cheaper than a single personal training session or on-par with a gym membership, it could still seem like a serious commitment.
That feeling is magnified by how all of its equipment and classes and data can feel a bit overwhelming. The startup might have to spend a fortune on retail establishments that can guide users through their first Tempo experience. There’s also no mobile version yet, so you can’t bring the work outs on the road with you.
Eldeeb seems guinely motivated to keep improving the product so it’s better than commuting to work out. “Getting to the gym or class is often half the battle. By bringing the gym to you and structuring the classes to be as efficient as possible, Tempo not only makes improving your health more convenient, but it gives you back your most precious resource: time.”
For those comfortable lifting the cheap weights they have at home or hitting up a budget gym, Tempo might seem needlessly overwrought and expensive. But for anyone who needs more instruction or wants to get a Barry’s Bootcamp-worthy workout at home, Tempo might be just their speed.
from Social – TechCrunch https://ift.tt/2T3F3qS Original Content From: https://techcrunch.com
0 notes